스프링 개발 초기 설정
1. facet 버전 맞추기
프로젝트 우 클릭 > Properties > Project Facets > Dynamic Web Module 버전 설정, Java 버전 설정
2. pom.xml 설정
- Maven : 자바 자동화 build tool.
- Project Object Model : 프로젝트 관리 및 빌드에 필요한 환경 설정, 의존성 설정, 라이프 사이클 관리 등
즉, maven을 통해 빌드를 자동화하기 위해 필요한 라이브러리를 pom.xml이라는 설정 파일에 정의해두면, 네트워크를 통해 자동으로 라이브러리를 다운받아 프로젝트를 손쉽게 관리할 수 있다.
프로젝트 초기 생성 이후 개발 과정에서 추가적으로 필요한 라이브러리는 MVN Repository를 통해 추가할 수 있다.
아래는 프로젝트 개발 시 실제로 추가했던 dependency들이다.
<!-- for MySQL -->
<dependency>
    <groupId>mysql</groupId>
    <artifactId>mysql-connector-java</artifactId>
    <version>8.0.24</version>
</dependency>

<!-- for Datasource -->
<dependency>
    <groupId>org.apache.commons</groupId>
    <artifactId>commons-dbcp2</artifactId>
    <version>2.8.0</version>
</dependency>

<!-- for mybatis -->
<dependency>
    <groupId>org.mybatis</groupId>
    <artifactId>mybatis</artifactId>
    <version>3.5.6</version>
</dependency>

<dependency>
    <groupId>org.mybatis</groupId>
    <artifactId>mybatis-spring</artifactId>
    <version>2.0.6</version>
</dependency>

<!-- for Transaction -->
<dependency>
    <groupId>org.springframework</groupId>
    <artifactId>spring-tx</artifactId>
    <version>${org.springframework-version}</version>
</dependency>

<!-- for jdbc -->
<dependency>
    <groupId>org.springframework</groupId>
    <artifactId>spring-jdbc</artifactId>
    <version>${org.springframework-version}</version>
</dependency>

<!-- for File upload -->
<dependency>
    <groupId>commons-fileupload</groupId>
    <artifactId>commons-fileupload</artifactId>
    <version>${commons-fileupload-version}</version>
</dependency>

<!-- for JSON -->
<dependency>
    <groupId>com.fasterxml.jackson.core</groupId>
    <artifactId>jackson-databind</artifactId>
    <version>2.12.3</version>
</dependency>

<dependency>
    <groupId>org.json</groupId>
    <artifactId>json</artifactId>
    <version>${json-version}</version>
</dependency>

<!-- for lombok -->
<dependency>
    <groupId>org.projectlombok</groupId>
    <artifactId>lombok</artifactId>
    <version>1.18.22</version>
    <scope>provided</scope>
</dependency>
3. web.xml 설정
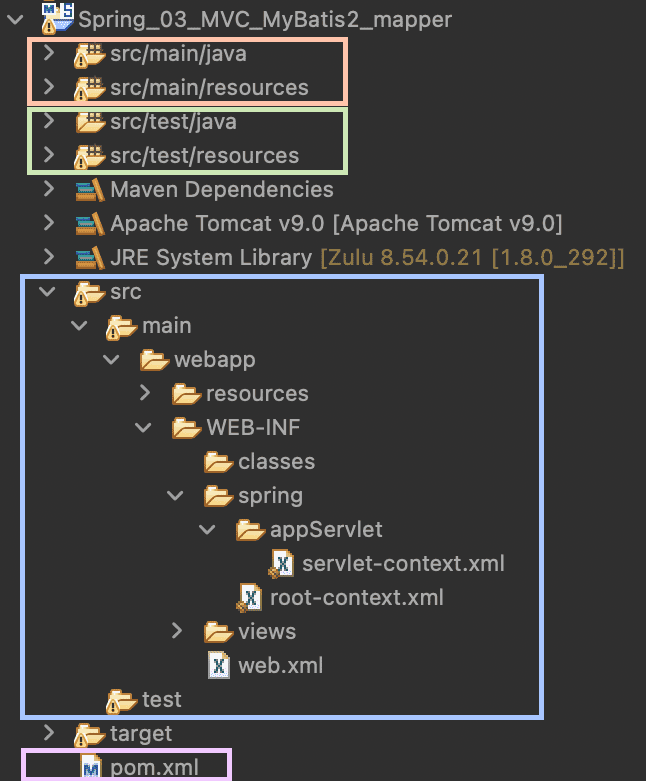
sts에 스프링 프로젝트를 생성하면 아래와 같은 파일 구조로 프로젝트가 생성된다.

- web.xml : 웹 환경 설정 파일
- WAS(Web Application Server)가 구동되면 최초로 web.xml을 읽어 애플리케이션에 필요한 환경 설정을 마친 뒤 애플리케이션을 메모리에 로드한다.
- DispatcherServlet, Root Context와 ContextLoaderListener, Filter 등을 등록한다.
DispatcherServlet 설정
DispatcherServlet은 여러개 설정할 수 있으며, 각 DispatcherServlet 마다 서로 다른 ApplicationContext를 생성할 수 있다.
<!-- Processes application requests -->
<servlet>
    <servlet-name>appServlet</servlet-name>
    <servlet-class>org.springframework.web.servlet.DispatcherServlet</servlet-class>
    <init-param>
        <param-name>contextConfigLocation</param-name>
        <param-value>/WEB-INF/spring/appServlet/servlet-context.xml</param-value>
    </init-param>
    <load-on-startup>1</load-on-startup>
</servlet>

<servlet-mapping>
    <servlet-name>appServlet</servlet-name>
    <url-pattern>/</url-pattern>
</servlet-mapping>
Root Context 설정
최상위 context를 설정하기 위해 로드할 설정 파일(root-context.xml)을 지정한다. 이를 포함한 context 설정 파일들을 로드하기 위해 ContextLoaderListener를 설정한다.
<!-- The definition of the Root Spring Container shared by all Servlets and Filters -->
<context-param>
    <param-name>contextConfigLocation</param-name>
    <param-value>/WEB-INF/spring/root-context.xml</param-value>
</context-param>

<!-- Creates the Spring Container shared by all Servlets and Filters -->
<listener>
    <listener-class>org.springframework.web.context.ContextLoaderListener</listener-class>
</listener>
Filter 설정
클라이언트의 요청이 들어오게 되면 DispatcherServlet에 요청을 전달하기 전에 필터 과정을 거쳐 요청에 맞는 부가 작업을 처리하기 위한 역할. 말 그대로 “필터”.
아래는 거의 필수적으로 설정해야 하는 인코딩 필터
<filter>
    <filter-name>encodingFilter</filter-name>
    <filter-class>org.springframework.web.filter.CharacterEncodingFilter</filter-class>
    <init-param>
        <param-name>encoding</param-name>
        <param-value>UTF-8</param-value>
    </init-param>
</filter>

<filter-mapping>
    <filter-name>encodingFilter</filter-name>
    <url-pattern>/*</url-pattern>
</filter-mapping>
4. servlet-context.xml 설정
web과 관련된 context 설정 파일. Controller, View, Interceptor 관련 설정을 맡는다.
- Controller를 등록해두면 자동으로 객체를 생성하여 DI를 한다.
<!-- Enables the Spring MVC @Controller programming model -->
<annotation-driven />
<context:component-scan base-package="com.capo.myapp.controller" />- Controller와 응답 화면(페이지)를 연결하기 위한 ViewResolver를 설정한다.
<!-- Resolves views selected for rendering by @Controllers to .jsp resources in the /WEB-INF/views directory -->
<beans:bean class="org.springframework.web.servlet.view.InternalResourceViewResolver">
    <beans:property name="prefix" value="/WEB-INF/views/" />
    <beans:property name="suffix" value=".jsp" />
</beans:bean>

<!-- Handles HTTP GET requests for /resources/** by efficiently serving up static resources in the ${webappRoot}/resources directory -->
<resources mapping="/resources/**" location="/resources/" />
<view-controller path="/user/loginView" view-name="login"/>
<view-controller path="/user/auth/listView" view-name="list"/>
<view-controller path="/user/registerView" view-name="register"/>- Interceptor 설정도 여기서 한다.
<interceptors>
    <interceptor>
        <mapping path="/*/auth/**"/>
        <beans:ref bean="loginInterceptor"/>
    </interceptor>
</interceptors>
5. root-context.xml 설정(web이 아닌 것들)
web 이외의 설정을 위한 파일. 특히 Model, AOP, Advice 관련 설정은 여기에 한다.
<!-- Root Context: defines shared resources visible to all other web components -->
<context:component-scan base-package="com.capo.myapp.model"></context:component-scan>
<context:component-scan base-package="com.capo.myapp.advice"></context:component-scan>
<aop:aspectj-autoproxy></aop:aspectj-autoproxy>- MyBatis를 사용한다면 관련 객체 주입도 여기서 설정한다.
<context:property-placeholder location="classpath:db.properties"/>

<bean id="dataSource" class="org.apache.commons.dbcp2.BasicDataSource"
        p:driverClassName="${db_driver}"
        p:url="${db_url}"
        p:username="${db_username}"
        p:password="${db_password}">
</bean>
<bean id="sqlSessionFactory" class="org.mybatis.spring.SqlSessionFactoryBean"
        p:dataSource-ref="dataSource"
        p:typeAliasesPackage="com.capo.myapp.model.dto"
        p:mapperLocations="classpath:mapper/**/*.xml">
</bean>
<bean id="sqlSession" class="org.mybatis.spring.SqlSessionTemplate"
        c:sqlSessionFactory-ref="sqlSessionFactory">
</bean>

<mybatis-spring:scan base-package="com.capo.myapp.model.dao"/>
6. DI(Controller, Service, Repository)
스프링 프로젝트 파일 구조에서 윗 부분은 실제 웹 서버와 관련된 자바 소스들이 있는 디렉터리다. src/main 아래에는 실제 배포되는 애플리케이션 관련 자바 소스를, src/test 아래에는 테스팅 용도의 자바 소스를 저장한다.

중점적으로 볼 부분은 src/main/java 디렉터리! MVC 패턴을 따라 패키지를 구성할 때도 Controller와 Model부분을 나누면 servlet-context.xml과 root-context.xml 설정할 때도 쉽다.
추가 +
interceptor는 Controller와 함께 servlet-context.xml에 설정하여 관리 받아야 하므로 controller 패키지 아래에 구성한다.스프링의 최대 강점이자 특징인 DI를 위해 XML에서 Bean으로 직접 설정할 수도 있고 클래스에 Annotation을 표시할 수도 있다.
Annotation은 컨트롤러는 @Controller로, 서비스는 @Service로, 모델은 @Repository로 설정하면 된다.
